Edibles & Herbs

Peppers: Hot & Sweet

This year we have a wide selection of various hot and sweet peppers at the nursery, and this weekend we're celebrating our biggest pepper stock of the season! Hurry in and pick some up today, but first, keep reading and learn what peppers you don't want to miss according to Randall, our Bedding Manager! 

Sweet Peppers

'Cubanelle' Sweet Pepper

'Cubanelle' Sweet Pepper

In the United States, the term "sweet pepper" encompasses a wide variety of mild peppers that, like the chilie, belong to the Capsicum family. Both sweet and hot peppers are native to tropical areas of the Western Hemisphere. Sweet peppers can range in color from green, yellow, orange, red, purple, brown to black. Their usually juicy flesh can be thick or thin and flavors can range from bland to sweet to bittersweet.

A sweet pepper's Scoville scale is 0 and therefore doesn't bring any spice or heat to your palate, just wonderful texture and flavor! (What's the Scoville scale? Read on to learn!)

The best known sweet peppers are the bell peppers, so-named for their rather bell-like shape. They have a mild, sweet flavor and crisp, exceedingly juicy flesh. When young, the majority of bell peppers are a rich green, but there are also yellow, orange, purple, red, and brown bell peppers. The red bells are simply vine-ripened green bell peppers that, because they've ripened longer, are very sweet. In cooking, they find their way into a variety of dishes and can be sauteed, baked, grilled, braised and steamed. Sweet peppers are an excellent source of vitamin C and contain fair amounts of calcium, phosphorus, iron, thiamine, riboflavin and niacin.

Hot Chiles

'Santa Fe Grande' Pepper

'Santa Fe Grande' Pepper

One of the wonders that Christopher Columbus brought back from the New World was a member of the Capsicum genus, the chile. Now this pungent pod plays an important role in the cuisines of many countries including Africa, China (Szechuan region), India, Mexico, South America, Spain, and Thailand. There are more than 200 varieties of chiles, over 100 of which are indigenous to Mexico. They vary in length from a huge 12 inches to a 1/4" pewee. Some are long, narrow and no thicker than a pencil while others are plump and globular.

Their heat quotient varies from mildly warm to mouth-blistering hot. As a general rule, the larger the chile the milder it is. Small chiles are much hotter because, proportionally, they contain more seeds and veins than larger specimens. Those seeds and membranes can contain up to 80 percent of a chili's capsaicin, the potent compound that gives chiles their fiery nature. Since neither cooking nor freezing diminishes capsaicin's intensity, removing a chile's seeds and veins is the only way to reduce its heat. After working with chiles, it's extremely important to wash your hands thoroughly, failure to do so can result in painful burning of the eyes or skin (wearing rubber gloves will remedy this problem). Chiles are a rich source of vitamins A and C, and a good source of folic acid, potassium and vitamin E.

The Scoville Scale

The Scoville scale measures the "hotness" of a chile pepper or anything derived from chiles, including hot sauce. The scale measures the concentration of capsaicin, the active ingredient that produces that heat we feel when biting into a chile. The Carolina Reaper comes in at a whooping 1.4 to 2.2 million points while a common Jalapeno measures 2,500 to 8,000 points. How much heat can you handle?

Growing

Pepper love full sun and a regular watering. When the first blossoms open give the plants a light application of E.B. Stone Organics Tomato & Vegetable Food 4-5-3 to help them maintain healthy growth and an abundant harvest!

A Few of Our Favorites

When you stop in, don't miss a few of Randall, our Bedding Manager's favorite varieties...

'Cubanelle' Sweet Pepper - A new type for us, this is known as a "frying type" with 4-5" long, red peppers also great roasted, baked, stuffed and fresh.

'Grandpa's Favorite Jalapeno' Hot Pepper - 2" dark red peppers that are excellent fresh in salsa and salads, dried or pickled.

'Santa Fe Grande' Pepper - A long, thin-walled pepper with a spicy-hot flavor used dried in sauces and soups. 

The Herb List

Each Spring, we bring in an abundance of herb varieties for your to choose from. Whether you're looking for Sweet Basil to make a classic pesto sauce (one of the best Basils to use!) or something a little more unusual, we've got it!

Check out more information on each herbs including growing habits and pairings below and visit us for garden-fresh herbs today! 

Warm Season Veggies

Starting around the first week of April you will see our summer veggies and herbs in stock! If you are eager and your greenhouse is ready, we have plenty of seeds in stock now!

Warm Season Crops 101

            Setting "fruit" (eggplants, peppers, squash, tomatoes, etc.) is the objective of warm season crops. These crops require warm soil and short days to germinate, but need long days and higher temperatures to form and ripen fruit.

            Early varieties need less total heat than later ones because in general, have a shorter growing period to mature fruit. Early varieties of tomatoes include cherry tomatoes (think small to medium-sized fruit) and varieties that are more cold tolerant.  If you're living on the other side of the tunnel (Berkeley, Oakland and Alameda residents) you'll have the best luck with early varieties because of the weather and thus, the shorter growing season. 

Late varieties require more heat to mature. The larger tomatoes, like Beefsteak that needs at least 80 plus days of good consistent heat to ripen, and do best on this side of the tunnel. For those living in Lafayette, Walnut Creek and areas with hot hot summers can plant mid-April and then again in late June, early July. By staggering your planting, you can be harvesting your summer veggies till October!

Vegetables for April - August (warm season)

  • Tomatoes
  • Peppers
  • Beans
  • Corn
  • Cucumber
  • Eggplant
  • Melons, including Watermelon!
  • Pumpkins
  • Squash, both summer and winter
  • Strawberries, plant these year-round! 

Figuring Out Planting Time

            Our area is not subject to prolonged frost or water saturated soil. Warm season crops need warm temperatures. In many cases, you will not speed up your harvest by planting earlier than suggested. Plants grow more slowly in cool weather, so earlier planted vegetables of the same type end up being harvested at the same time as those planted later.

Just beginning your edible garden? Check out Randall, our Bedding Manager's Five S's of Starting an Edible Garden

Part 2: Cool Season Veggies

Don't forget! Right now is the best time to plant your cool season veggies! Check out our selection and get planting!

If you want to grow Brussels Sprouts, cabbage, cauliflower and broccoli, be sure to get these in the ground ASAP as they need as much time as possible in the ground to form their crop! 

As a reminder, for all veggies, we recommend mixing Master Nursery’s Paydirt into your soil.  A blend of 45% chicken manure and 55% mushroom compost and redwood sawdust is great for loosening clay soils and improving moisture retention. Don’t forget to feed them too! Fertilize with Master Nursery's Tomato & Vegetable Food 5-10-10 or E.B. Stone Organics Tomato & Vegetable Food 4-5-3 to ensure your best harvest. 

sweetpeas.jpg

SWEET PEAS

Although not edible, we love sweet peas for their candy-like scent! Sweet peas like sun or light shade; choose a site with rich and moist well-draining soil. A hardy, winter to spring annual vine growing 10’ tall, they are ideal for a temporary screen. Provide a trellis, string or wire and watch as these beautiful climbers create a lush focal point.

Colorful, fragrant Sweet Peas make magnificent cut flowers for vases in large, long lasting quantities. Cut flowers at least every other day and remove all seedpods to maximize blooms.

PEAS

Peas like a soil that retains moisture yet drains well. Provide support for climbing peas and do pick often or the plant might stop producing! The three main types of peas we get in stock are Garden or English, sugar snaps, and snow peas:

1. English, green, or garden peas are bright green, bulging pods are tough and inedible. The peas need to be shelled. The peas can be very sweet and should be eaten soon after harvest.

2. Sugar snaps are curved, plump deep green pod with tender sweet peas. Everything is edible. Pods are crunchy filled with peas. These can be eaten cooked or raw having a very sweet flavor. Be careful not overcook them.

3. Snow peas are wide and flat green with very small peas. Everything is edible. They are very crunchy with a sweet flavor. Can be eaten raw or cooked. Be careful not to overcook.

CARDOONS

Cardoons, like their close cousins artichokes, are members of the Thistle family and native to the Mediterranean. Some food scholars believe that the relationship is more than simply close, insisting that the artichoke was born in 15th century Europe as a result of cardoon cultivation. Still relatively unknown in the United States, cardoons look like gigantic, overgrown celery stalks with artichoke tendencies, and tasting almost like a tangy cross between artichokes and celery. While the artichoke plant is prized for its edible flower, the cardoon plant holds its promise of pale, cloudy gray-green stalks.

Preferring a damp and mild climate, they are grown as a food crop in Italy, France, Spain, Australia, and Northern California, among other places, and primarily as ornamentals in England. Very cold weather is said to make the stalks tender.

A hardy herbaceous perennial growing 4 feet high and 5 feet wide, cardoons are great for a border or accent with handsome spiny foliage and purple thistle-like flowers in summer. Plant in sun with well-draining soil and water regularly. Be sure to feed once in fall and again in spring for healthy growth.

spinach.jpg

SPINACH

Spinach is a wonderfully versatile vegetable, popular worldwide, with nearly every cuisine featuring spinach somewhere in its repertoire. The Italians are particularly partial to spinach and have hundreds of dishes using this vegetable. The words Ă  la Florentine mean the dish contain spinach.

Spinach requires rich, fast draining, soil. Give plants plenty of water and 1 feeding to encourage lush, full foliage. Popeye's addiction to this "power-packed" vegetable comes from the fact that it's a rich source of iron as well as vitamin A and C.

ARTICHOKES

A perennial, make sure you prepare your soil well. (Be sure to pick up a few bags of Master Nursery’s Paydirt to work into your existing soil!) Growing up to 4 feet tall with a spread of 6 feet in diameter, allow plenty of space for them to grow. Keep your ‘chokes heavily watered, about once a week during their growing season. Any moisture deficiency will result in loose buds.

COLLARDS

Collard greens are very popular in the American South, where most of the American crop is grown. Plant in full sun with ample and deep watering. We recommend fertilizing before heads begin to form. 

Upon harvest, remove the oval leaves from the stalk before cooking. It is important to cook collards for a length of time or the leaves can be chewy. A good source of vitamin C and K, the flavor can be mild and a little bit stronger than cabbage. 


Missed Part 1: Cool Season Veggies? Read up and learn what winter veggies you don't want to be missing! 

Part 1: Cool Season Veggies

Now is the best time to plant your cool season veggies! We have so many delectable varieties available, stop in and get your winter vegetables planted today! 

Be sure to start with Brussels Sprouts, cabbage, cauliflower and broccoli first, these plants need as much time as possible in the ground to form their crop. 

For all your veggies, we recommend mixing Master Nursery’s Paydirt into your soil.  A blend of 45% chicken manure, 55% mushroom compost and redwood sawdust, it is great for loosening clay soils and improving moisture retention. Don’t forget to feed them too! Fertilize with Master Nursery's Tomato & Vegetable Food 5-10-10 or E.B. Stone Organics Tomato & Vegetable Food 4-5-3 to ensure your best harvest. 

veg4.jpg

KALETTES

A brand new vegetable! (And quickly becoming the new superfood!) This cross between Kale and Brussels Sprouts has the best flavors of both parents, sweet and nutty! The little miniature Kales are borne along the thick stem, like sprouts. The small, kale-like leaves are ruffy green and purple. 

Plant in full sun and successively to ensure a steady availability. Water deeply and fertilize before heads begin to form. Harvest mature mini-heads when they reach one to one and a half inches wide. 

CELERY

Choose a sunny location and keep in mind that celery requires ample moisture and a heavy feeding of nitrogen. The crop is ready to cut in 90 - 100 days after transplanting. Harvest by cutting below the ground through the taproot. A cut-and-come-again crop, just harvest a few outer stalks at a time and enjoy! 

FUN FACT: Before the sixteenth century, celery was used exclusively as a medicinal herb. For hundreds of years now Italians have been using it in salads and these days, it is one of the most popular vegetables in the world.

KALE

All hail Kale! One of the most popular veggies in the last few years and for good reason, it ranks very high in vitamins and minerals. It's a great plant to have in the winter garden due to its ornamental qualities as well! Boasting great textures and color, it can be used in mass for beds, as accents and in pots.

Plant in full sun and water deeply and frequently. Be sure to fertilize before heads begin to form. We recommend planting successively to ensure a steady availability. Pick individual leaves or harvest entire plant, either way you'll have a nutritious garden-to-table delight. 

BROCCOLI

The word broccoli comes from the Italian word for ‘Cabbage Sprout’ and indeed, the plant is a relative to cabbage, Brussels sprouts and cauliflower.

Plant in fertile, well-draining soil and water deeply. It is best not to plant Brassica family crops (cole crops including cabbage, cauliflower, Brussels sprouts, turnips, kale, collard and mustard greens) in the same spot year after year. Disease and insects may build up in a particular area, so be sure to rotate crops in your garden.

One planting may produce for as long as three months in fall in winter from auxiliary shoots after the main head is removed. Feed 1-2 times before heads begin to form for a healthier, more abundant crop.

veg3.jpg

BRUSSELS SPROUTS

Said to have been cultivated in 16th century Belgium, plant Brussels sprouts in a sunny spot where they won't be disturbed. Because they do get taller than the average veggie, be sure to choose a site where they won't shadow other plants. When watering, be mindful of the rains, any dry period of a few days and your Brussels Sprouts will need moisture. (Especially when planting in a raised bed.) Like Broccoli, fertilize 1-2 times before sprouts begin to develop.

KOHLRABI

 Kohlrabi looks like a cross between a cabbage and a turnip and is often classified as a root vegetable, even though it grows above the ground. A member of the Brassica family, but unlike cabbages, it is the bulbous stalk that is edible rather than the flowering heads.

There are two varieties of kohlrabi. One is purple and the other is pale green. They both have the same mild and fresh tasting flavor, not dissimilar to water chestnuts. Kohlrabi is neither as peppery as a turnip nor as distinctive as cabbage, but easy to see why people think it is a little of both. Although kohlrabi is not a very popular vegetable in North America, it is commonly eaten in Europe, as well as in China, India, and other parts of Asia. The bulbs are often sliced and eaten in salads and the greens are cooked in mustard oil with garlic and chilies. It can be served as an alternative to carrots and turnips, nicely steamed and whipped.

Plant kohlrabi in full sun and water deeply. Fertilize at planting and 1-2 times through the growth cycle. Rich in potassium and vitamin C, grow as you would cabbage and enjoy!

In the mood for more veggies? Of course you are! Check out Part 2: Cool Season Veggies

Potato Growing Guide

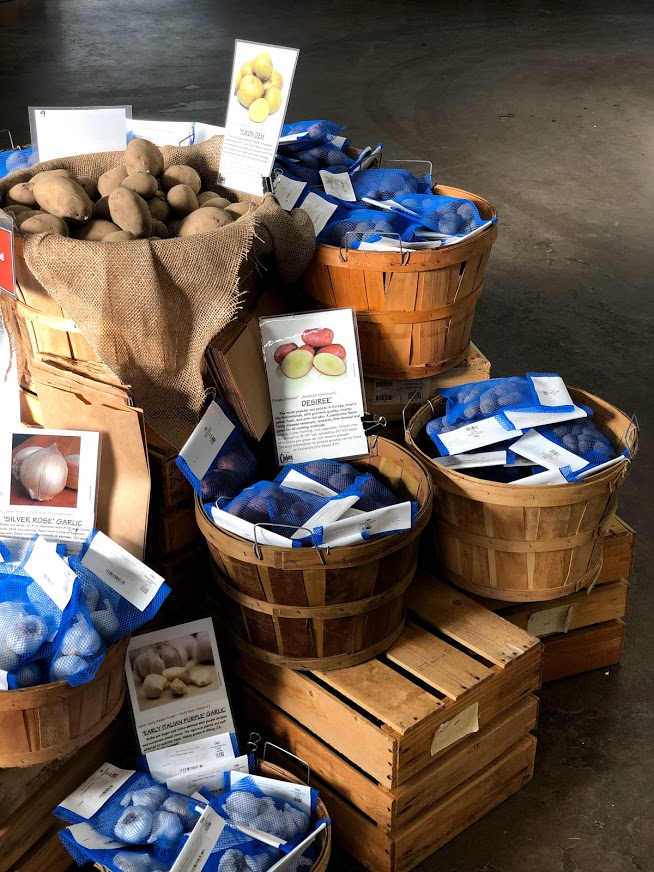
Potatoes are in, and all organic too! Now is the time to get your seed potatoes in the ground to ensure a mid-summer harvest. We have a variety of tubers in stock for spring and will guide you through the growing process!

IMG_7436.jpg

With over 10 varieties to choose from, you’ve got choices! From our must-have potato types that you’ll recognize from the grocer to more unknown varieties, here’s a few we recommend that you aren’t going to find at the store:

Yukon Blush

An early season ‘tater that produces uniform, round golden tubers with blush red eye areas. Though smaller in size, it produces more tubers per plant than its cousins. this is a great substitute for ‘Yukon Gold’ or ‘Yukon Gem’. Perfect for culinary uses, and scab resistant!

Vermillion

A mid-season, long, oval, fingerling variety with red skin and deep, pink-red flesh. Suitable for a wide range of cooking, with a creamy texture, earthy taste and unique coloring. Resistant to virus, splitting and powdery scab. Moderate storage time.

All Blue

Deep blue skin and blue flesh with a thin white line just under the skin. Great for baking or frying, AND excellent for making colorful chips. When boiled the color turns to a light blue - adding 2 Tbs. vinegar will keep the color darker. Excellent keeper.

”Seed”, in the following, means a small piece of potato with 2-3 “eyes.” Certified seed potatoes are disease free and have been selected to give you the best results with the highest yields.

Seed potaotes may have already begun to sprout. This is okay. Please handle them carefully and leave the sprouts on. If you break sprouts off you will delay emergence of the vines; and reduce, the ultimate size of the potatoes. Tubers the size of a hen’s egg can be planted whole; larger potatoes should be cut into 'seeds,' meaning a small piece of potato with 2-3 'eyes.' Allow the tubers a day to 'heal over' before planting, but be sure to not allow them to dry out.

IMG_7439.jpg

Soil Preparation

The ideal potato soil is deep, light and loose, a well-drained but moisture retentive loam. Fortunately, the potato is also very adaptable and will usually produce quite respectably where soil conditions are less than perfect. All soils should be deeply prepared before planting by incorporating organic matter into the native soil.

When planting potatoes in our clay soil, you will have to amend the area to create that light, loose and moisture-retentive soil ideal to tubers. To amend a 50 square foot area to an eight inch depth, mix the following in with your soil, plant and water thoroughly:

  • 10 cu. ft. of soil conditioner: Pay Dirt

  • 5 lbs. FST Iron Sulphur, used to acidify and break up clay

  • 10 lbs. E.B. Stone Organics Tomato & Vegetable Food 4-5-3

  • 10 lbs. Gypsum

Planting

Plant in a shallow trench 6-8 inches deep with seed pieces 10-14 inches apart. With a rake, cover the seeds with roughly 3-4 inches of soil, be sure not to fill the trench completely. Depending on the temperature, sprouts should emerge in two weeks.

Or use one of our specialized Potato Planting Containers!

Planting in one of these containers make harvesting and hilling a breeze. Perfect for those who want to grow potatoes on their balcony or patio, we highly recommend picking one of our containers up - find them in the Garden Shop!

Using one of our Potato containers that focus on aeration (the black container pictured below on the left or the Smart Pot on the right) will ensure your potatoes have excellent drainage, releases heat and airs out the root zone. The Potato Patch (middle container pictured) is great for easy harvest, just pull the inner rim from the outer and find your yummy ‘taters easily accessible from wide openings in the container!

IMG_8588.jpg

Hilling

Once the stems measure roughly 8 inches high, you will need to hill the vines. Hilling, ridging up the soil around the base of the vine, is crucial when creating an environment for potatoes to thrive in. Mound the soil away from the sprouts, leaving about half the vine exposed. You will need to hill every 2 weeks for the first 6 weeks of growth, carefully adding only an inch or two of soil to the hill each week. Hilling is not an exact science, but adding too much soil will cover the leaves and reduce the yield, whereas adding too little will expose the potatoes to light, turning them green. 

For ease of gardening, we also carry potato bags in our shop. The bags can be placed on a porch or deck, no garden beds required! Utilizing the burlap bag will ensure that the plant isn’t overwatered or overheated.

Watering

The less water, the better for your potatoes. A light irrigation will keep the tubers less watery and in turn, produce better tasting potatoes. Note that potatoes are not drought resistant and will search out moisture when water is scarce.

IMG_7440.jpg

Fertilizing

Once the vines emerge and until blooming ends, we recommend foliar spraying every two weeks in the mornings when it is still cool. A fish emulsion and/or a liquid seaweed extract sprayed directly on the leaves will result in a higher yield and you can’t beat the ease of application! Once the vines are blooming, there is no need to fertilize; new vegetative growth has ceased and the tubers have begun to form. Additional fertilizing may affect the flavor of the potato.

Harvesting

After about 7 or 8 weeks you will see the earliest blossoms, signifying that the potatoes are ready! To check on whether the harvest is ready or not, you can “rob” a few tubers from the end of the row, avoiding injury to the roots and stressing the plant. If you wait patiently for the tops to die back naturally, your harvest will be more robust with a richer flavor. 

Dryish soil is definitely an advantage when harvesting; the tubers come up a lot cleaner and with less effort. After the tops are dead, leave the tubers in the ground, undisturbed for 2 weeks to “cure,” while the skins toughen up, protecting the tubers from scuffing and bruising during harvest and storage. If the soil is wet, let them air-dry on the surface for a few hours before gathering them. Separate out the discard (or set aside to eat immediately) any blemished, scabby, misshapen or injured tubers. Do not put cut or damaged tubers (those injured during harvest) into a sack of good ones; they will rot and rot other potatoes with them.

Storage

Potatoes keep best in the dark at 36 to 40 degrees F. at high enough humidity that they don’t dry out, and given enough air circulation that they can respire. Light and or warmth promote sprouting and will also turn the potatoes green which is a sign of toxins accumulating.

Choose from our many varieties and grow your own tubers, so they will be ready to be harvested this summer!